Although I am a tea girl through and through, I do enjoy the occasional milky coffee. And the idea of doing a coffee-flavored cake has been on my mind for awhile now. This little delectable little confection is a take-off on Mary Berry’s Cappuccino Cake in her Baking Bible book. (Which, I might add, has a new edition coming out – I strongly recommend going out and getting it, I’ve only begun to work my way through the original edition, but everything I’ve made so far is absolutely delicious!).
So I mostly stuck with Mary’s recipe, though I did change out a few things, mostly adding new ingredients. I added Kahlua, instant coffee, light brown sugar, and a little buttermilk, just to change it up a bit and make it my own. Also, I used my usual Norpro nonstick cheesecake pan for tea-sized cakelets instead of one big cake.
Aside from dissolving the cocoa powder and instant coffee granules in the boiling water and Kahlua, this was one of the easiest cakes to make, and it all came together with just a whisk. (Okay, you have to get the mixer out for the frosting, but at least the cake didn’t need it.)
Mary’s recipe goes with weights vs cups for most of the ingredients, which is what I’ve got below as well since it’s much more accurate. Once you’ve weighed out or measured all the ingredients, it’s basically prep the chocolate/coffee, then dump everything else in one bowl and whisk it together. You have to plan ahead a little and make sure the butter is softened, but otherwise once you have all the ingredients prepped, it’s “add rest of the ingredients and beat together.”
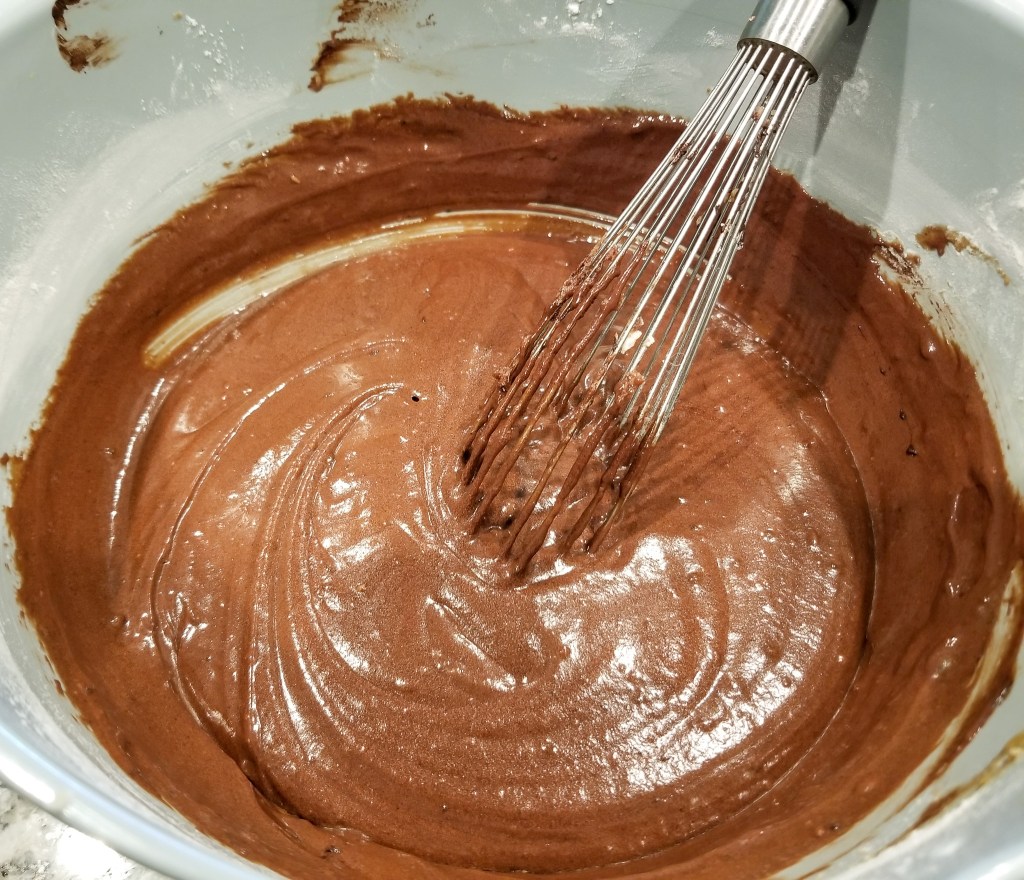
I mean, that’s basically it – you get this lusciously thick and creamy mixture that is hard not to take a spoon and just consume as it is.
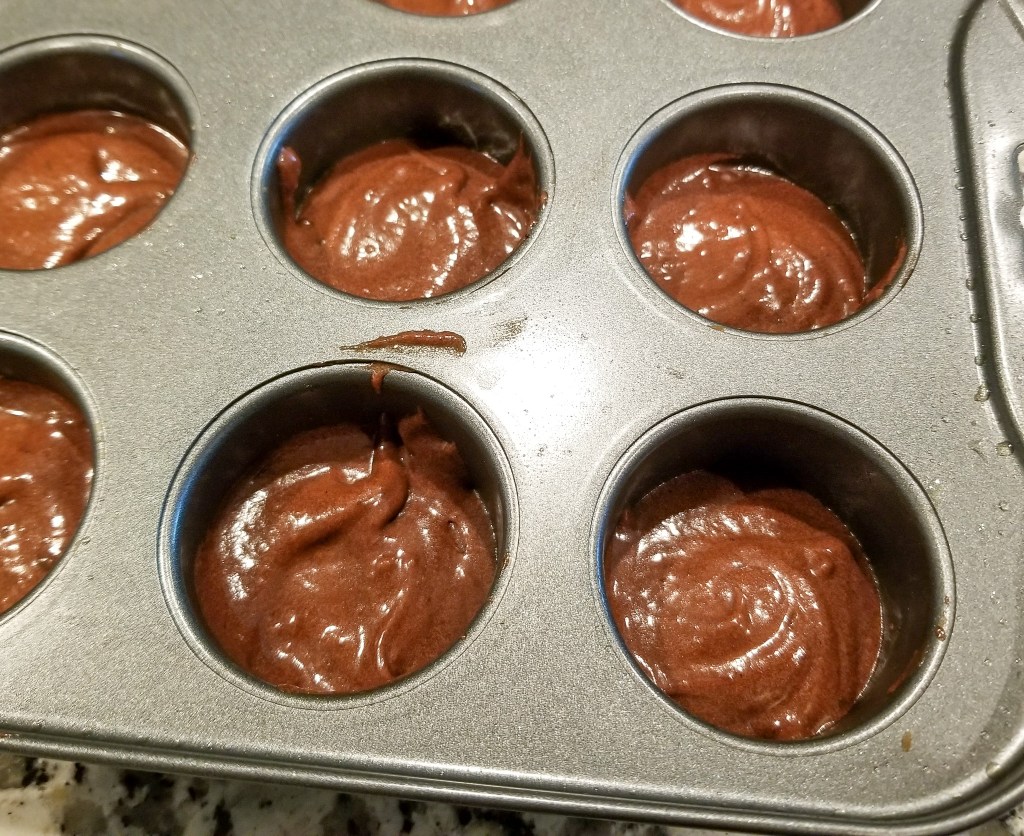
I filled each well of my tin with about a tablespoon and a half, so that each well is not more than half full. And then you get nice little cakes that go to the top, but come out of the tin perfectly cleanly. (I sprayed with a butter-flour spray and cut out small parchment circles for the bottom of each well, just to be sure.)

For the filling and frosting, I melded two recipes together. As the frosting in Mary Berry’s book was whipped cream-based, I wanted something a little more stable than that for piping. However, I did add the instant coffee per her directions, while I went more with the standard American Buttercream that is in Bernice Baran’s Frosted baking book (amazing book, too, by the way!).
This buttercream took quite a lot of beating to make it really light and fluffy, and almost so it doesn’t taste like it has as much butter in it as it does. I loved how it turns out to have the color of a lovely cappuccino foam. It also piped beautifully, and holds up well for a few days in the fridge (though take it out at least 30 minutes before serving).

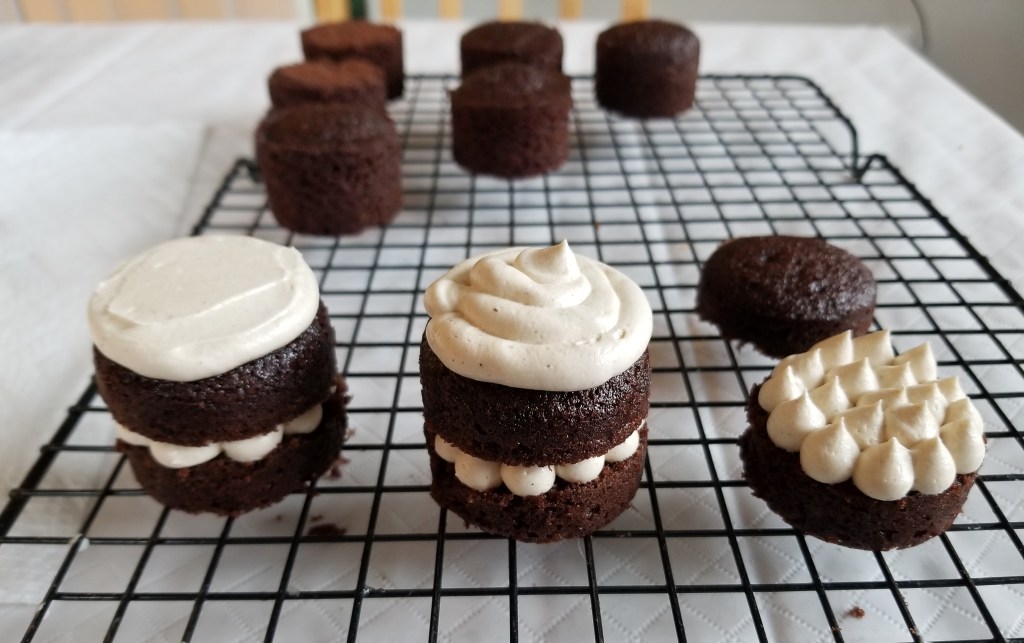
The assembly is the fun part for me. Starting with the cooled cakes and a simple round piping tip, I just pipe little dots all around the middle and then put the top on – I love the look of the piping in the center, it just seems a little more special than just simple spreading it on. Just get a little assembly line going – cut in half, pipe dots, add the top – and it goes pretty quickly.

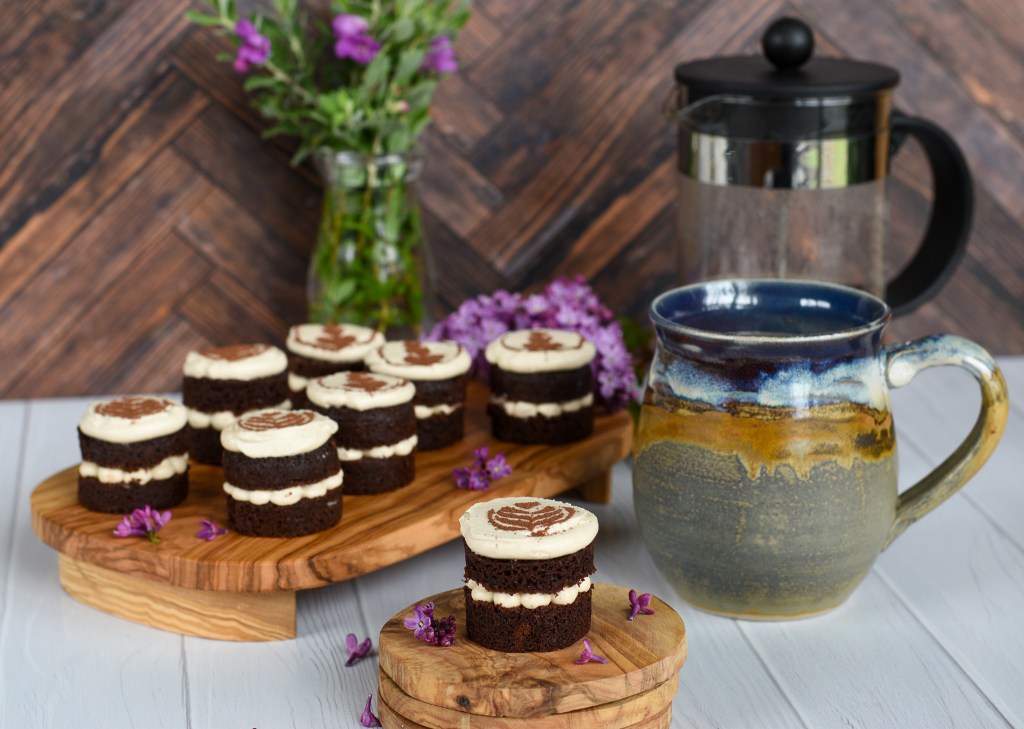
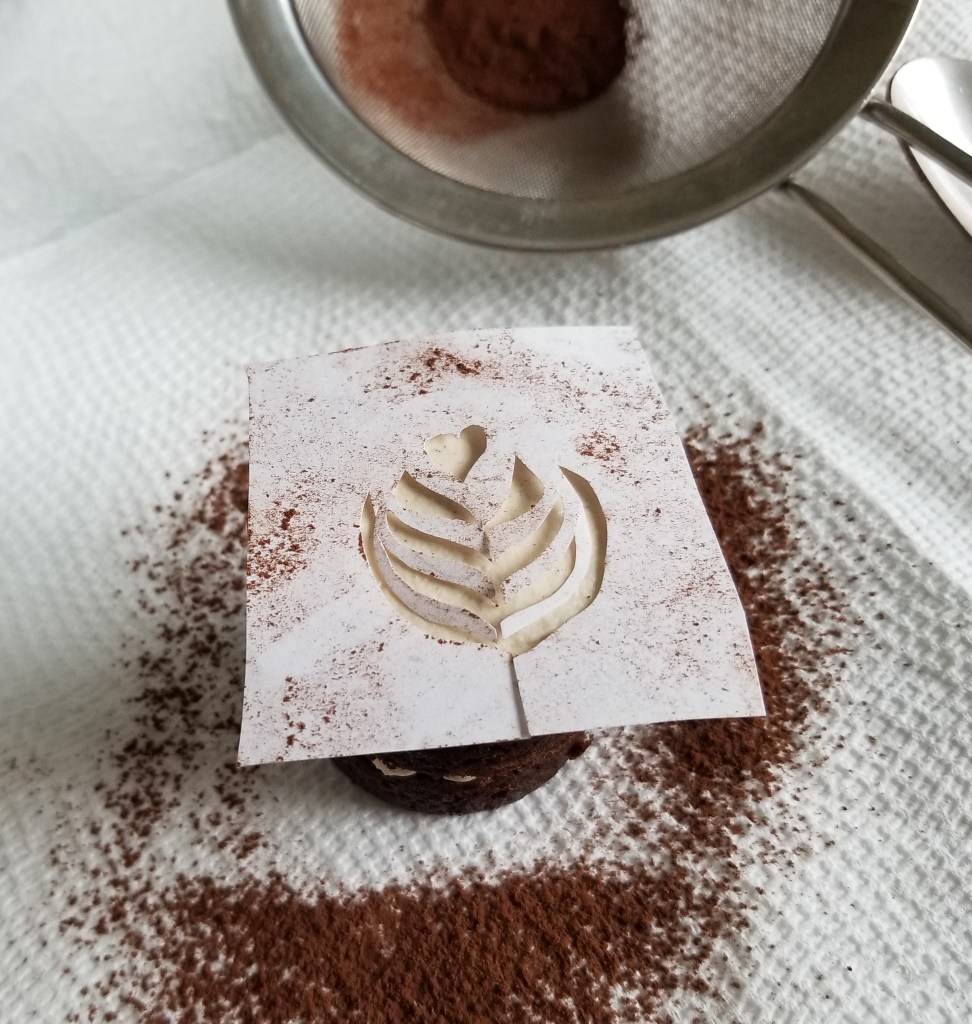
Because these cakes have a stenciled form of “latte art” sifted on the top in cocoa powder, I wanted the tops, however, to be pretty flat. So I piped a circle instead, and used a small offset spatula to even it out and make sure I had a nice smooth surface to sift on. (Tip: gently hold the top layer as you’re smoothing out the frosting on the top so it doesn’t shift around too much on the filling.)
Then put the cakes into the fridge for a good 30 minutes before attempting to sift the stencil on the top. That gives time for the frosting to set a little and it’ll make stenciling easier and cleaner. I found that by the time I had done the first dozen, put it in the fridge, then finished up the next dozen and so on, the first dozen was ready for stenciling. So I didn’t really have to wait to finish them up.

Try not to judge me too harshly – I hadn’t planned ahead enough to acquire any of the myriad of stencils of latte art that one can get on Amazon or elsewhere, so I had just created a few of my own using copy paper. I think it worked well enough for my first try, even so!
This bit is a bit messy, I’ll admit, but I do think the effect was worth the effort.
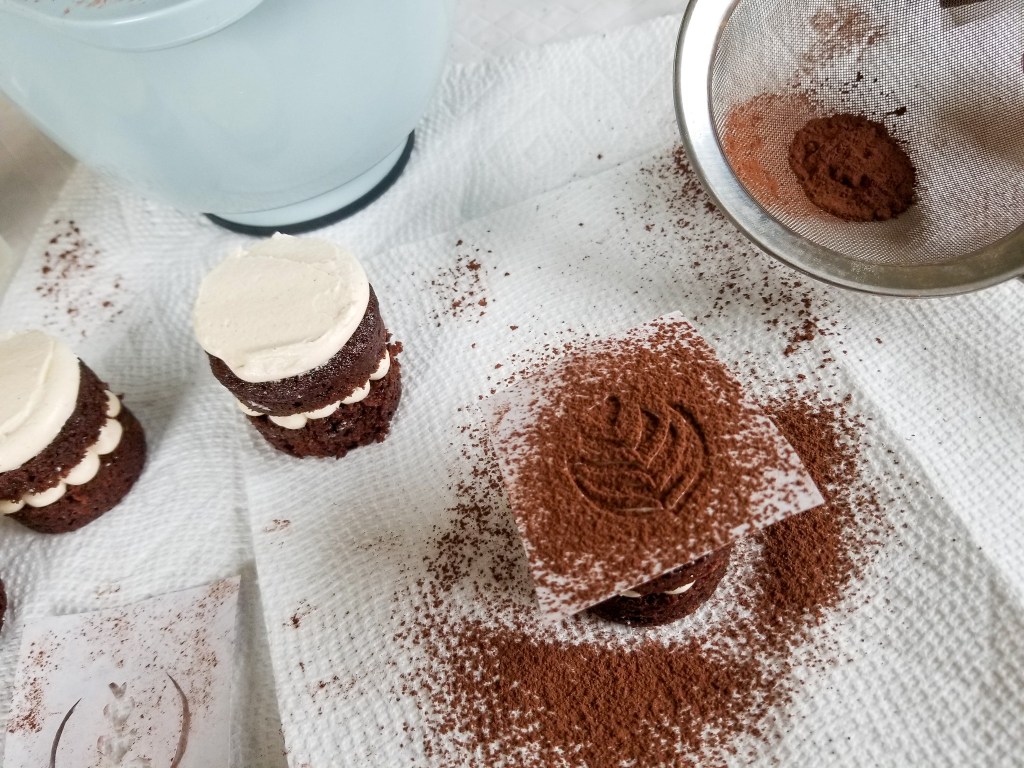
I went for two different designs. I know they’re not perfect, but is the foam art on one’s latte perfect either? 🙂 I do think this dresses up the little cakes nicely for a proper afternoon coffee (or tea!).

The Kaffee Klatches I went to when I lived in Germany remind me quite a lot of a nice afternoon tea – there’s lovely cakes to go with that too, and lots of good conversations with friends and family. A “safe space” of another culture.
So give this little gem of a cake a try – the cake is simply decadent and delicious and goes perfectly with this light-as-air frosting. And if the decoration on top has you reaching for a carafe of coffee instead of a cup of tea – well, we all need a little variety in life, don’t we?!

Cappuccino Cakelets

Ingredients
- 50 g. (2 oz.) cocoa powder
- 2 tsp. instant coffee
- 3 Tbsp. boiling water
- 3 Tbsp. Kahlua liqueur
- 3 large eggs, room temp, beaten
- 25 ml. (3 oz.) whole milk
- 25 ml. (3 oz.) buttermilk (can use 50 ml/6 oz whole milk if you wish)
- 175 g. (6 oz.) self-raising flour
- 100 g. (4 oz.) softened butter (if you use unsalted, add a 1/8 tsp. salt)
- 150 g. (6 oz.) granulated sugar
- 125 g. (4 oz.) light brown sugar
- 1 c. (2 sticks, 227 g.) unsalted butter, room temperature
- 3 1/2 c. (420 g.) powdered sugar
- 1 tsp. boiling water
- 1 tsp. Kahlua liqueur
- 1 tsp. instant coffee
- 3 Tbsp. heavy whipping cream, cold
- 1/8 tsp. salt
- 1 tsp. vanilla (optional)
- 1/2 tsp. cinnamon (optional)
- Cocoa powder or drinking chocolate for dusting
Cake
Filling and topping
Directions
To make the cake batter: Preheat the oven to 350° F/180° C. Prepare the Norpro mini cheesecake pan with a butter/flour cooking spray and cutting small parchment paper circles for the bottom of each well (if you take a couple of parchment sheets and fold them 3-4 times, then use one of the removable bottoms to cut around, you can make these pretty quickly).Measure the instant coffee into a measuring cup, add the Kahlua and boiling water and stir until the coffee granules are dissolved. Measure the cocoa powder into a large bowl and add the coffee mixture into the cocoa powder and mix well until it has a paste-like consistency.
Add all the remaining ingredients to the bowl and beat until just combined (I simply whisked it together). It will be a fairly thick batter (don’t overbeat).
Measure out about 1 and a half tablespoons of the batter into each of the wells in the tin and gently level the surface. For the mini cakes, bake 15 minutes (you can check with a toothpick that comes out clean that they’re done). The cakes will be well risen and starting to shrink away from the sides of the tin. If you’re baking an 8-inch cake, bake for 25-30 minutes. Let cool in the tins for a few minutes, then remove, peel off the parchment, and let them finish cooling on a wire rack.
To make the Filling and frosting: Prepare the coffee/Kahlua preparation as you did for the cake – add the instant coffee to the Kahlua, then add the boiling water and stir until the granules have dissolved.
Using a stand or hand mixer, put the softened butter in a large bowl and beat on medium-high speed for 1-2 minutes, until the color turns pale yellow. Add the coffee mixture and blend together until integrated.
Add the sugar to the butter and mix at low speed to combine, then go back to medium-high speed and beat the buttercream for at least 5 minutes, until all of the sugar is dissolved and the buttercream no longer feels gritty. Scrape the sides of the bowl periodically, as needed.
Pour the cream and beat the mixture for another 3 minutes at medium-high speed; the buttercream should be even lighter and smoother. Add the salt, vanilla and cinnamon (if desired) and mix until just combined. If you want to remove excess air to smoothly pipe and frost your cakes, whip the buttercream another 3 to 5 minutes on low speed.
To assemble the Cakes: Once the cakes have cooled, cut them all in half so you have two layers. (You should not need to level off the tops – you can level off the tops with the buttercream and the offset spatula so you can apply the stencil on the top.)
With your buttercream in a piping bag and a large round piping tip, pipe dots on the bottom layer, gently setting the top layer of cake on top of the filling (you do not need to press down). Pipe a circle of the buttercream around the top and use a small offset spatula to flatten out the top, creating a smooth top for applying the cocoa powder with the stencil (gently hold the top layer of cake as you flatten with the offset spatula so it doesn’t shift around on the filling). Before adding the stencil, put your cakes in the fridge for 20-30 minutes for your frosting to set up a bit.
Once set, take the cakes out of the fridge and set your stencil on the top of each cake. Taking cocoa powder in a small sieve, gently sift the cocoa powder onto the top of each cake, then gently remove the stencil. You can keep these in the fridge a couple of days before serving, but take them out 30 minutes before serving.
