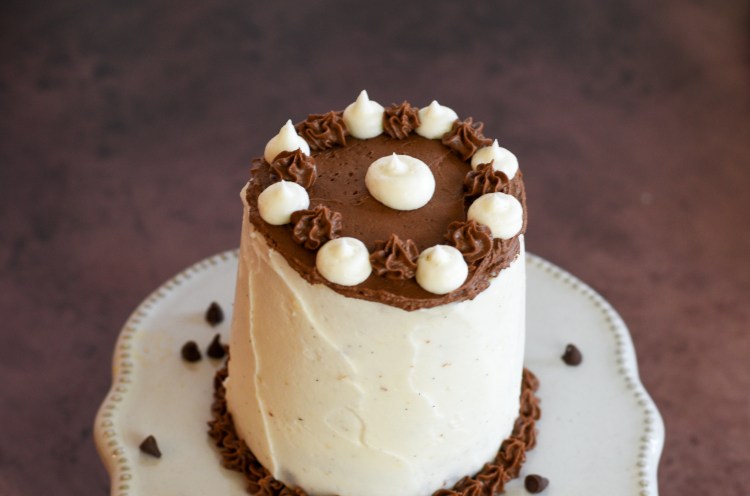
This may not actually be a “mini” version of a cake (which to me means more like the two-bite, petit four version). But it is small – only 3 inches in diameter. I was looking for an opportunity to use a Silverwood multi-piece baking set I’d purchased previously, and doing these little three-tiered chocolate and vanilla cakes seemed to fit the bill nicely.

This was fun to do, and I really like the way it turned out, even if it was a bit fiddly – splitting up the batter into three, splitting up the icing into two, trying to figure out how to decorate the top…was trying to keep it somewhat simple, but a still a little fancier than an everyday bake!
You’ll have to cut me a little slack when it comes to icing the cakes – this is the first time I’ve ever even tried a “crumb coat” with my icing, i.e., putting a very thin coat of icing around the assembled cake just enough to keep the crumbs from getting all mixed in with icing when you come back later after it’s hardened a bit and finish it up with another, final outer coat.
I started with a recipe for a white cake from Sam at Sugar Spun Run, and modified it to make the different tiers.

Beat the butter until creamy, then do the same after you’ve added the veggie oil and sugar 
You can use clear vanilla to keep the batter as white as possible, but I’ve always liked vanilla paste as my vanilla of choice 
Sift the dry ingredients together – flour, baking powder, and salt 
Mix the dry ingredients and milk in, alternating until they are incorporated and you have a nice, thick batter. 
As a last step, after you’ve beaten egg whites in a separate bowl until they have stiff peaks, gently fold them into this mixture. This helps with a nice fluffy cake texture.
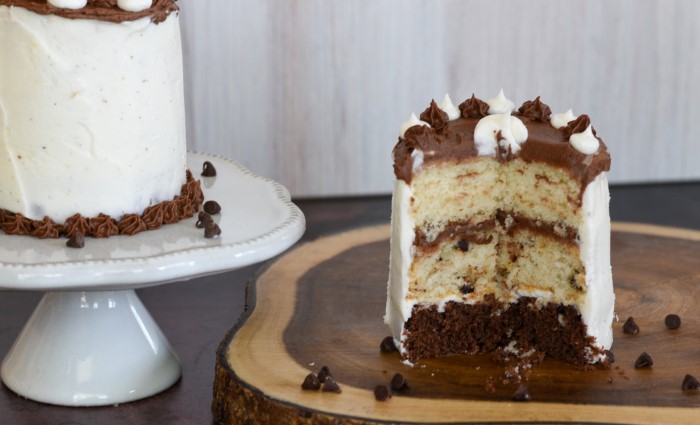
My final steps with the batter included dividing it up into three bowls, adding mini chocolate chips to one of them, and cocoa powder to the third.

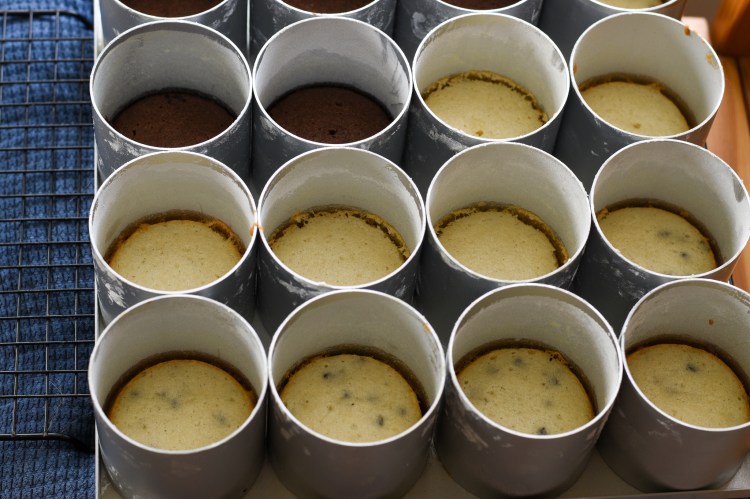
Since I was making several smaller cakes rather than one 8′ or 9′-inch cake, the prep time for the tins took me a little longer. I used both a fat and flour to coat the rounds, and the tray on which the rounds sit as they bake.
Then I used a 1/4 measuring cup to drop the batter into the rounds, so I could be assured I was getting the same amount of batter in each, and my tiers would come out evenly.

They pull away from the sides a bit when they’re baked, but you end up with small-ish disks that can easily be put one on top of the other with a little tasty icing in between.
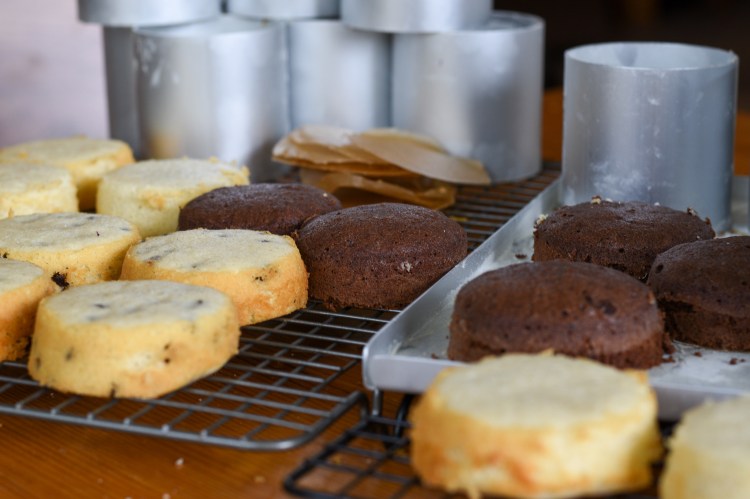

If your top is not perfectly flat, or sides not perfectly straight, you can do a little trimming with a serrated knife as you go. For me, my chocolate ones rounded a bit more than the others, so I sliced a thin layer off to flatten them a bit. But the other two layers didn’t need that attention for me.
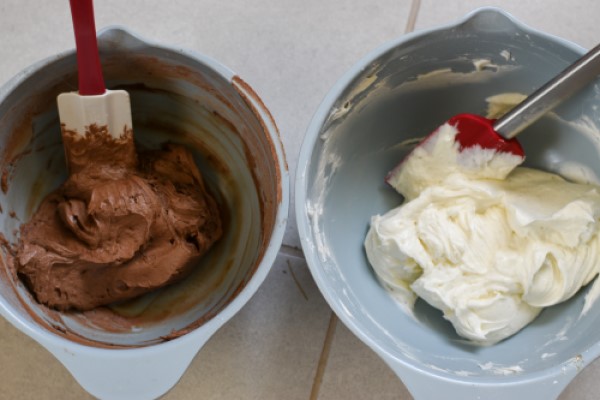
For the buttercream icing, I went with Sally’s Chocolate buttercream at Sally’s Baking Addiction. However, I split up the icing into two bowls before I added the cocoa powder as a last step. So I ended up with roughly half vanilla, half chocolate (a little more vanilla, since I iced the outsides of the cakes with vanilla only, so needed a little more of that than the chocolate).

Of each, I then took some to put in a piping bag as well, so I could pipe on a few flourishes at the end.

Now that you have your icing and cooled cakes, you’re ready to assemble! I took the approach of putting the dark chocolate layer at the bottom, then the chocolate chip layer, and vanilla at the top, almost like an ombre.
I also alternated the buttercream with the vanilla between the bottom two layers, and the chocolate between the top two, just for fun. Just like the contrasting colors – in the end, it all kinds of mixes together anyway – the chocolate and vanilla flavors – so my way of icing it was more for looks, though very tasty, just the same!


Then, of course, comes the crumb coat all around the sides, and let it cool in the fridge for a good 15 minutes to let it set a bit before putting on another layer of vanilla icing, and smoothing that with whatever kitchen tool you have that can scrape around the sides. (And I’ll ask for some grace here, too – first time I’ve ever tried to smooth out icing around a tall-ish cake! And if I’m honest, I didn’t find it as easy as it looks.)
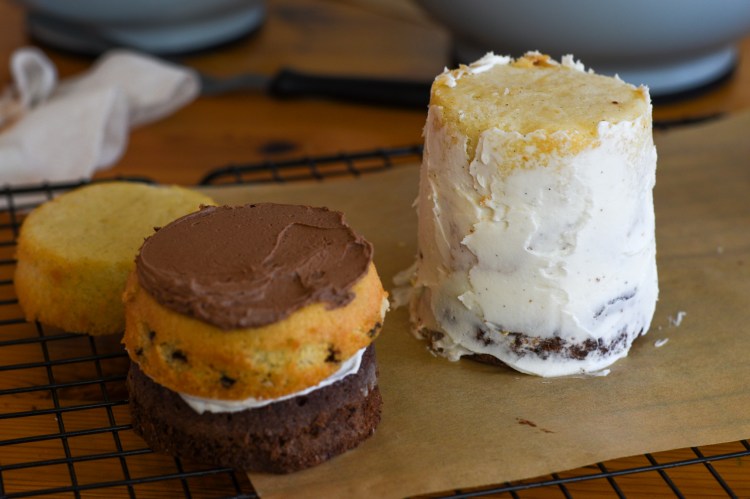

A little round of chocolate icing on the top, and you’re ready to add your final decorations.
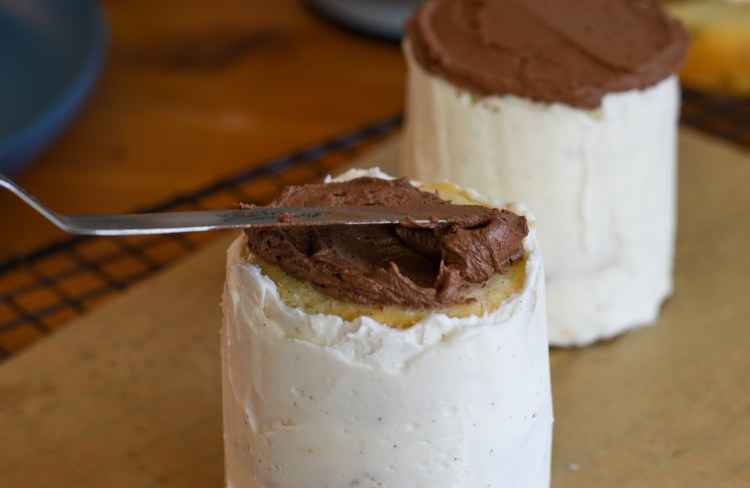
For the flourishes at the end, you can do whatever you want – I used one plain round piping tip, and one star one, and just alternated around the edge. You could drop a few more mini chocolate chips on top, or press them into the sides, or whatever takes your fancy to pretty them up.

So, filling up the 16 3-inch rounds once yields 4 small cakes, and you could continue to fill them again, and bake the next batch of the same size.
I opted instead to use some of my extra batter to bake three layers in my 5-inch tins, which I wrapped up and put in the freezer to pull out later. Even after that, there was enough left over for another 5-inch version. So the batter makes quite a few smaller cakes; or just make 1 8-inch round cake like normal people do. 🙂

Chocolate and Vanilla Tiered Cake
Ingredients
- 2 2/3 c. + 2 Tbsp. all-purpose flour
- 1 Tbsp. baking powder
- 1 tsp. salt
- 6 Tbsp. butter, softened
- 2/3 c. Canola or vegetable oil
- 2 c. granulated sugar
- 1 Tbsp. vanilla (clear, if you want your batter as white as it can be)
- 1 c. milk, room temperature
- 6 large egg whites, room temperature
- 1/4 c. mini chocolate chips (or a tad more doesn’t hurt!)
- 1/4 c. cocoa powder
Directions
Preheat the oven to 350 degrees Fahrenheit and prepare the 16 3-inch round tins by generously greasing and flouring the sides and the tray on which they sit (if using the Silverwood baking set). If using other tins, do the same, and apply parchment to the bottom. Be sure you’ve shaken out the excess flour before adding the parchment.Whisk together the flour, baking powder, and salt in a bowl, and set aside. Measure out the milk and set aside.
Using a stand or handheld mixer, mix the butter until creamy and lightening in color. Add the oil and sugar, and beat well until completely incorporated and creamy. Add the vanilla and beat in until incorporated. Use a spatula to scrape down the sides of the bowl as needed.
Add the dry ingredients and milk, alternating portions at a time, and incorporating before adding the next portion.
In a separate bowl, beat the egg whites until stiff peaks form. Gently fold the egg whites into the rest of the batter. Stop mixing when you no longer see egg white in the batter.
To make three different tiers, divide the batter up evenly into three bowls. Add the mini chocolate chips to one, and the cocoa powder to the other. Sift the cocoa powder to make sure there are no clumps and make it easier to incorporate.
Use a 1/4 c. measure to pour the batter into the individual 3-inch rounds so you end up with the same sized tiers.
Bake for 25-30 minutes, or until golden brown (except for the chocolate!) and the sides start to pull away from the tin. (I tend to test with a toothpick, and when it comes out clean, I’m done). If baking using larger tins, it may take 35-40 minutes to bake.
Let cool at least 15 minutes before taking out of the tins, and completely cool before icing.
To assemble, use the buttercream icing to make each cake one tier of chocolate (on the bottom), chocolate chip, then vanilla. You can use vanilla icing for one layer and chocolate for the other. Put in the fridge to cool down a bit and set. Then apply a crumb coat around the tiers and put back in the fridge to firm up again before applying the final coat of vanilla icing around the sides.
Apply chocolate icing around the top with a knife or small offset icing spatula, and finish by piping whatever chocolate/vanilla pattern you want on top using star, plain, or other piping tips you wish. Add more mini chocolate chips on top or around the cake to serve.
Chocolate and Vanilla Buttercream Frosting
Ingredients
- 1 c. unsalted butter, softened
- 3 1/2 c. powder sugar
- 1/8 tsp. salt
- 3 Tbsp. heavy cream or whole milk
- 2 tsp. vanilla
- 1/4 c. cocoa powder
Directions
Beat the butter until creamy. Sift together the powder sugar and salt and add to the butter, beating until incorporated.Beat in the heavy cream and vanilla until incorporated and creamy.
To make half vanilla, half chocolate icing, split the icing into two bowls. In one of the bowls, sift the cocoa powder and mix in until fully incorporated. If icing is too thick, add a bit more cream; if too thin, add a bit more powder sugar.
Icing is ready to use, may be piped or spread on cake. May also be frozen up to 3 months in the freezer, thawed and used.
I like this for afternoon tea because a small cake is already a better size when you slice off a piece to eat with your tea. And if you have friends over, you’ve got enough so everyone can try it, but there’s still room for the other courses of a typical afternoon tea.
It’s actually more a German afternoon tea tradition to have a whole cake or torte on hand to slice up and serve. But with regular-sized cakes and tortes, you end up with leftovers, and if you’re like me and are trying not to eat cake every day, it’s nice to not have that occur!


And don’t forget the tea!

