Tea and cake, cake and tea – for me this is the pinnacle of the afternoon tea experience. I know this is my thing, and it doesn’t exactly line up with the “history of the tea cake.” But when I started looking into “what exactly is a tea cake?” – the official definition, that is – it seems like it’s been different things in history, in different countries. So I figure I will just start my own tradition!
It is fascinating to trace the history of a food, and see how different people have interpreted it over time and distance. From what I’ve read, tea cakes have made an appearance across many geographies – England, Scotland, Ireland, Sweden, India, Australia, even the US and Mexico. And have taken very different forms that cover the categories of a bread, cake or even soft cookie.
It’s no surprise to find that a strong tradition of tea cakes comes from Great Britain, though it doesn’t seem to have been a “cake” at all, but a fruited bread, like a bun, almost – not soft like an American hamburger bun, but similar shape, slightly chewier, with dried fruit, split and toasted and topped with butter. I’ve made a version of this before that I love, and posted about here.
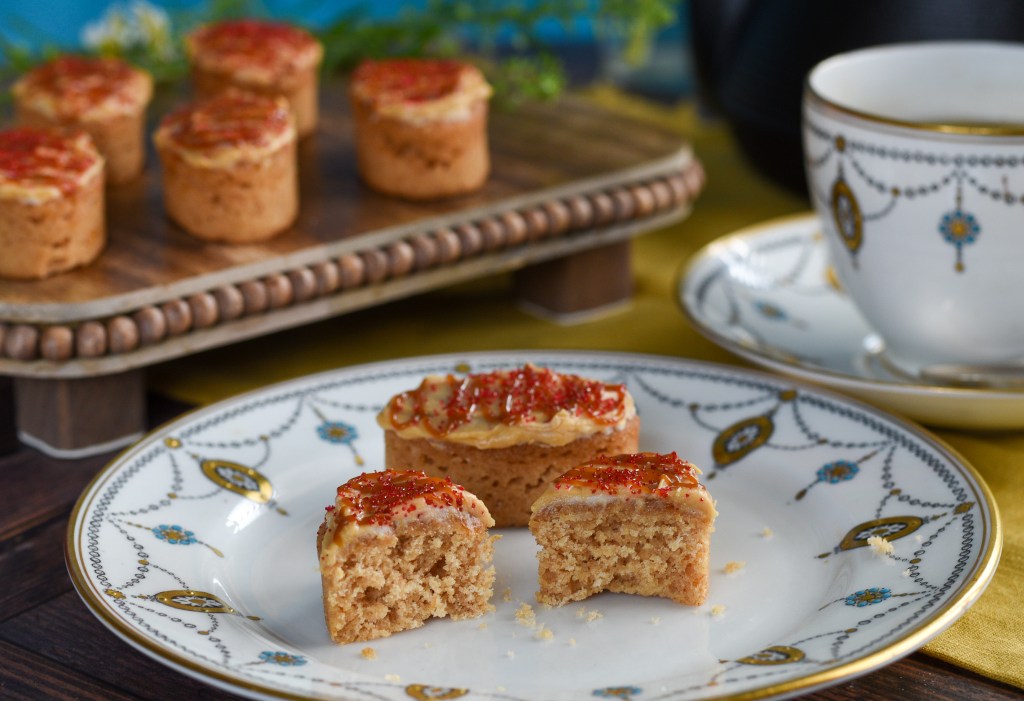
In the US South, a tradition arose for a soft round cake-like cookie that is not overly sweet, typically not frosted, but dusted with powdered sugar. Well, I’d like to take this further, and evolve my tea cakes more into the cake than the cookie. And I’m basing these on a small oval Silikomart silicon mold with 16 cavities (like this one here, or this one); each cavity is ~2 inches long, 1 and 1/8th inch wide, and 5/8ths of an inch tall. These make the perfectly formed oval, perfectly sized two-bite “tea cakes” for afternoon tea.


And it’s easy to be pretty consistent with size with this mold, because a tablespoon of batter is the perfect amount to get the cakes to come just to the top (if you use exactly a tablespoon they are just at the top, but a very slightly rounded tablespoon works as well. Just be consistent so you get a consistent bake).
I got this mold in the mail, and my mind just started buzzing with all the different cakes I could adapt to use it with. I just needed to find pound cake-like recipes that packed a punch of flavor, but could also take a little bit of frosting and decoration on top.
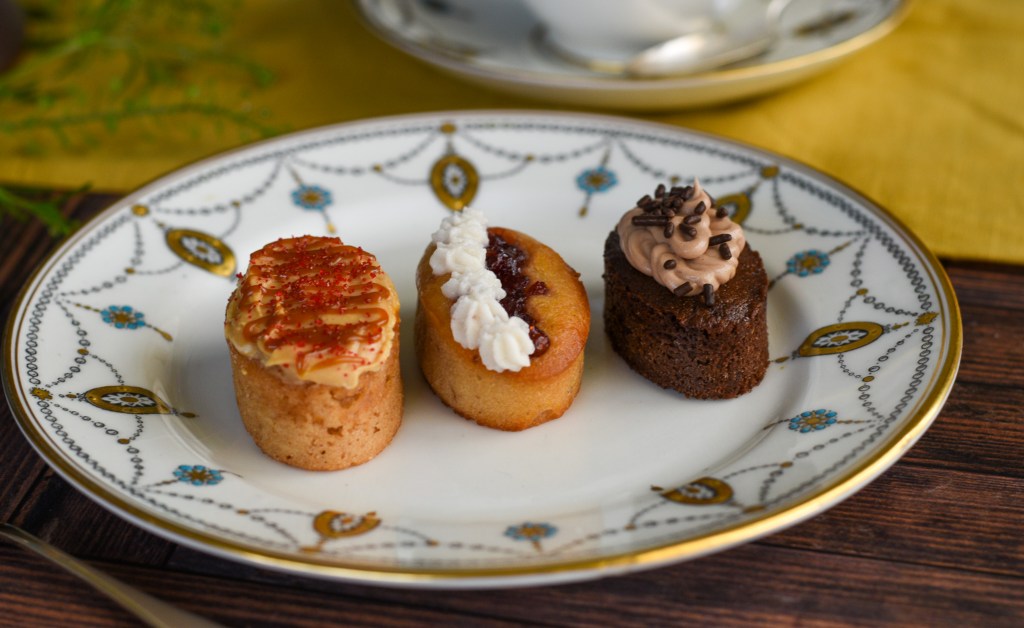
So I tried four different tea cakes, but am only sharing three of the recipes below, as I wasn’t entirely satisfied with the fourth one (that was lingonberry/lemon, the one in the middle right above with the dots of whipped cream). The flavor was nice, but the texture and baked color seemed a little off to me; so more experimentation necessary!
But the others I would totally make again, including Caramel Apple Cider, Chocolate, and Orange.
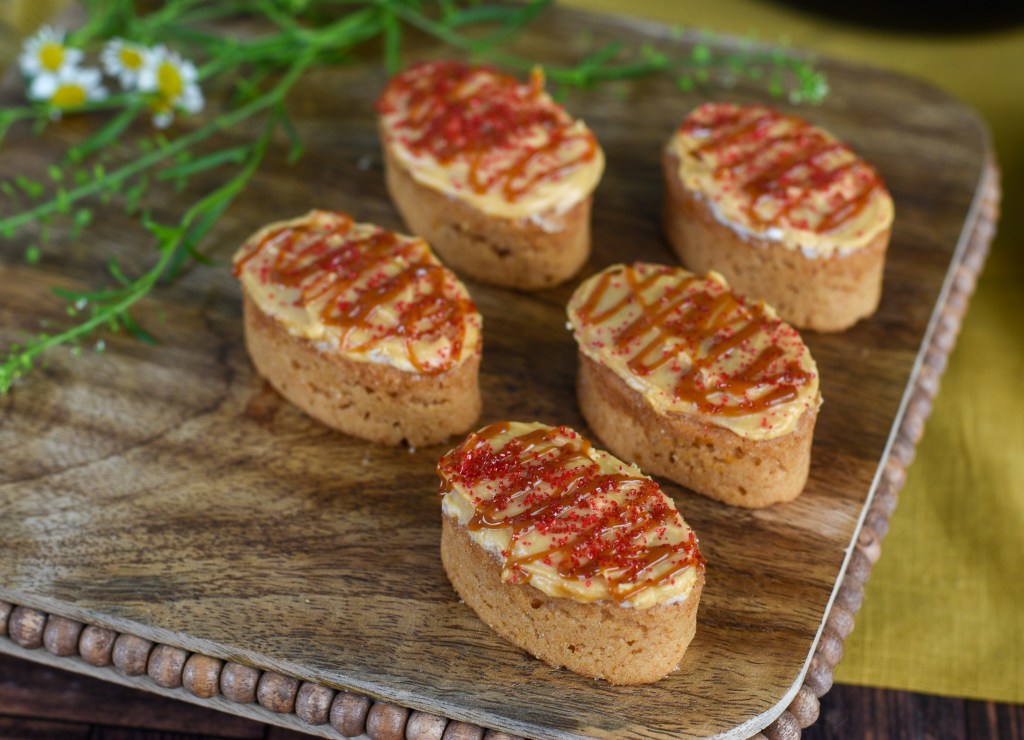
The Caramel Apple Cider is made super-flavorful by reducing the apple cider before using it in the cake. Just be careful not to overbake because it will get a little dry if you do. Oh, and I’d use more of the frosting next time – I didn’t calculate my measurements correctly so didn’t really have enough to go around the first time; the recipe below should be plenty.
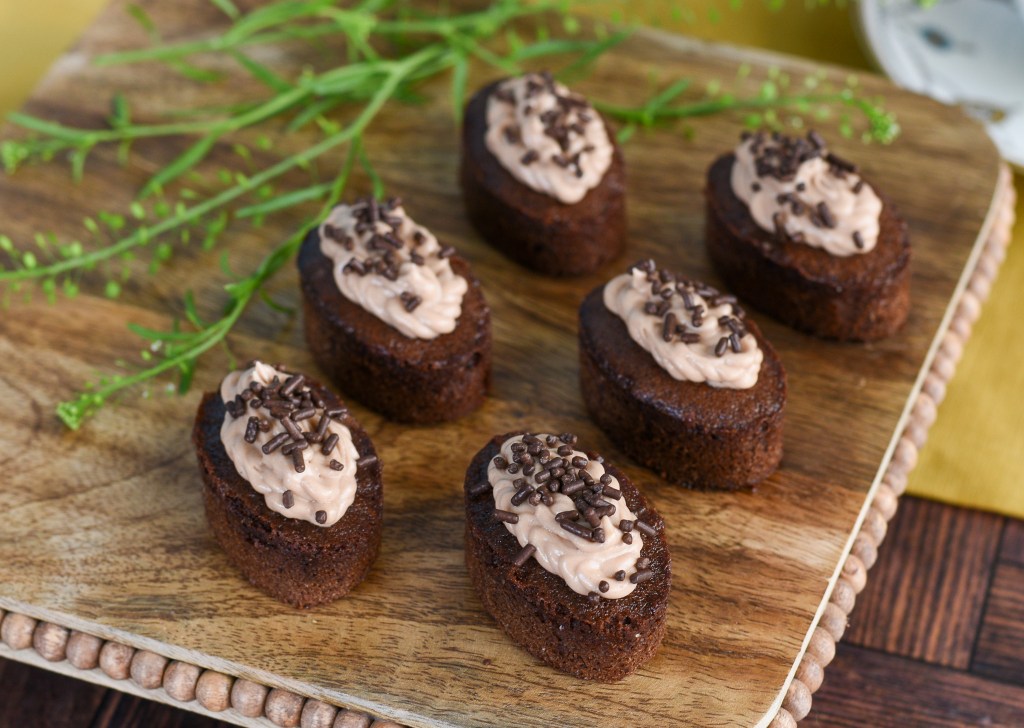
The Chocolate is a just pure chocolate, with espresso powder to help the chocolatey flavor really come through. For me there is almost nothing better than a dense, chocolatey cake!

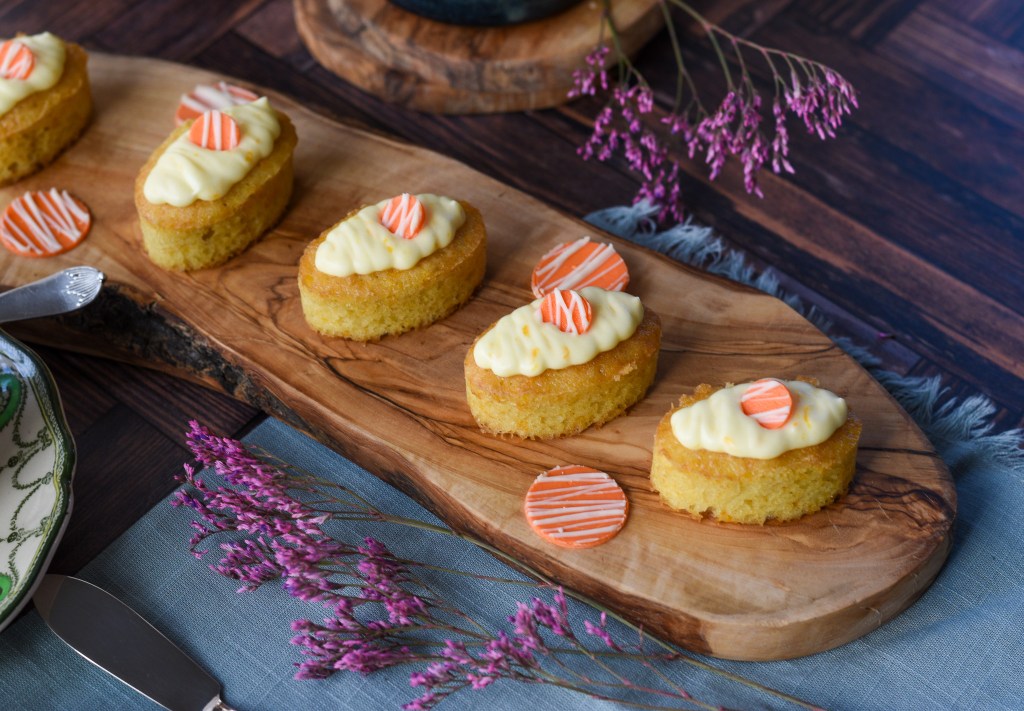
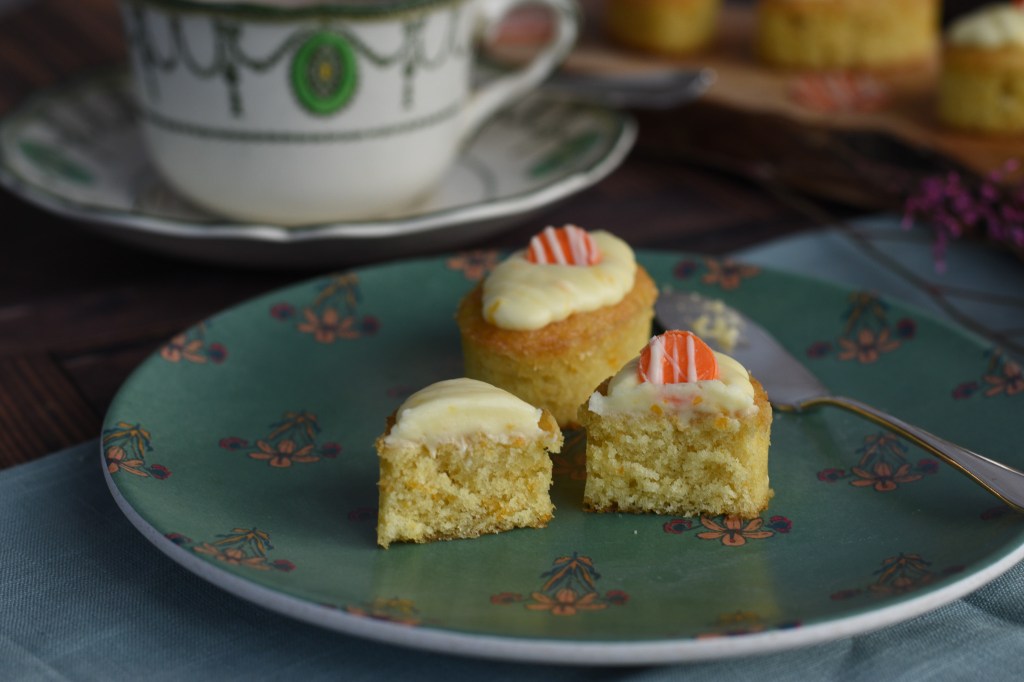
And when it comes to citrus cakes, like this Orange one, I always add more zest than any recipe calls for to make the flavor really zing. In fact you can pretty much see the zest in both the cake and frosting of this one – for some that might be a bit much, but I love the punch from that much orange.

What I really love about this approach to tea cakes is that you can whip together more than one flavor at once, so you can put together an afternoon tea plate that is really rather stunning. For example:

So without further ado, here’s three “tea cake” recipes to give a try!
Caramel Apple Cider Tea cakes

Ingredients
- 4 c. apple cider
- 2/3 c. granulated sugar
- 1/2 c. unsweetened applesauce
- 1/3 c. neutral oil (I used a vegetable oil)
- 1 large egg, room temp
- 1 tsp. vanilla extract
- 2 2/3 c. all-purpose flour
- 1 Tbsp. ground cinnamon
- 2 tsp. baking powder
- 1 1/2 tsp. salt
- 1/4 tsp. baking soda
- 1 c. powdered sugar
- 1.5 oz. cream cheese, softened
- 1/8 c. (2 Tbsp.) butter, softened
- 1 Tbsp. heavy whipping cream
- 1/2 tsp. vanilla extract
- 1-2 Tbsp. caramel sauce (like you would put on ice cream; Dulce de leche would work as well. I wasn’t exact in my measurement); plus a little extra to drizzle over the top of the teacakes at the end
- Red sanding sugar to sprinkle on the top at the end
Cake
Caramel Frosting
Directions
To make the Cake: To prepare the cider, in a large saucepan, bring the cider to a boil over medium-high heat and cook, stirring occasionally, until it’s reduced to 3/4 cup (takes about 45 minutes to 1 hour). Remove it from the heat, and let it cool completely before using in the cake.Preheat the oven to 350° F. Spray your 16-cavity silicon mold (each cavity is ~2″ x 1 and 1/8th” x 5/8th”) with cooking spray to prepare, and set aside.
In a large bowl, whisk together the sugar, applesauce, oil, egg and vanilla. In a medium bowl, sift together the flour, cinnamon, baking powder, salt and baking soda. Gradually add the flour mixture to the sugar mixture, alternating with the reduced cider. Make sure to begin and end with the flour mixture. Whisk until just combined after each addition.
Using a tablespoon measure, spoon a tablespoon of batter into each of the 16 mold cavities and lightly smooth out the tops with your finger. (You can level the tablespoon, or use a very slightly rounded tablespoon – just be consistent so all of the teacakes bake evenly.) Put into the oven and bake for 15-20 minutes (because these are so small, they do not take long to bake – check them at the lower temp, check that a toothpick comes out clean, and return them to the oven if needed). Remove from the oven when baked and let cool for 10 minutes on a cooling rack, then remove from the molds and repeat until all the batter is used.
To make the Caramel Frosting: In a medium bowl, beat the powdered sugar, cream cheese and butter until light and fluffy. Beat in the whipping cream, caramel sauce and vanilla until smooth.
To assemble the Tea cakes: Once the teacakes are cool, using a small offset spatula, take a good dab of the frosting and just spread it around the top of the cake. (I would use more than I’ve included in my pictures – I was being judicious initially, but would add more if making again). Drizzle a little additional caramel sauce and finish off with a sprinkle of red sanding sugar (red, like an apple!). Serve, and enjoy! These will keep for several days at room temp in an airtight container, or in the fridge.
Chocolate Tea cakes

Ingredients
- 8 Tbsp. unsalted butter, room temp
- 1 1/2 c. granulated sugar
- 3/4 tsp. salt
- 2 tsp. vanilla extract
- 1/2 tsp. baking powder
- 2 tsp. espresso powder (optional, but it enhances the chocolate flavor)
- 2/3 c. unsweetened cocoa (Dutch process or natural)
- 3 large eggs, room temp
- 1 1/4 c. all-purpose flour
- 3/4 c. milk, room temp
- 1 c. powdered sugar
- 1-2 Tbsp. unsweetened cocoa powder (I wasn’t exact)
- 1.5 oz. cream cheese, softened
- 1/8 c. (2 Tbsp.) butter, softened
- 1 Tbsp. heavy whipping cream
- 1/2 tsp. vanilla extract
- Chocolate jimmies sprinkles (for top at the end)
Cake
Chocolate Frosting
Directions
To make the Cake: Preheat the oven to 350° F. Spray your 16-cavity silicon mold (each cavity is ~2″ x 1 and 1/8th” x 5/8th”) with cooking spray to prepare, and set aside.In a medium mixing bowl, beat together the butter, sugar, salt, vanilla, baking powder, espresso powder and cocoa to make a somewhat clumpy mixture (the eggs will smooth it out). Add the eggs one at a time, beating well after each one. Scrape the sides of the bowl as you go, as needed.
Add half of the flour, beating at low speed to combine. Add all of the milk until combined, also at low speed, and finish with the remaining flour, beating gently until the batter is smooth.
Using a tablespoon measure, spoon a tablespoon of batter into each of the 16 mold cavities and lightly smooth out the tops with your finger. (You can level the tablespoon, or use a very slightly rounded tablespoon – just be consistent so all of the teacakes bake evenly.) Put into the oven and bake for 15-20 minutes (because these are so small, they do not take long to bake – check them at the lower temp, check that a toothpick comes out clean, and return them to the oven if needed). Remove from the oven when baked and let cool for 10 minutes on a cooling rack, then remove from the molds and repeat until all the batter is used.
To make the Chocolate Frosting: In a medium bowl, beat the powdered sugar, cocoa powder, cream cheese and butter until light and fluffy. Beat in the whipping cream and vanilla until smooth.
To assemble the Teacakes: Once all the teacakes have cooled, put the frosting in a tipless piping bag and swirl the frosting around the top of the teacake, being liberal and letting it pile up a bit, but not going all the way to the edge. Finish it off by sprinkling a few chocolate jimmies on top. Serve and enjoy! These will keep for a few days in an airtight container at room temp or in the fridge.
Orange Tea cakes

Ingredients
- 1 1/2 c. all-purpose flour
- 1/2 tsp. baking powder
- 1/4 tsp. baking soda
- 1/4 tsp. salt
- 3/4 c. unsalted butter
- 1 1/4 c. granulated sugar
- 1 tsp. vanilla bean paste or extract
- 1/4 c. orange zest (ca. zest of two oranges)
- 3 large eggs
- 1/4 c. fresh orange juice
- 1/4 c. milk or half-and-half
- 3 oz. cream cheese, softened
- 2 Tbsp. unsalted butter, softened
- 2 Tbsp. fresh orange juice
- 1 tsp. orange zest
- 2 1/2 c. powdered sugar
- Finish with a dusting of powder sugar, or make a white chocolate garnish: 4 oz. white chocolate, melted, Orange gel food coloring
Cake
Cream Cheese Frosting
Directions
To make the Cakes: Preheat the oven to 325° F. Spray your 16-cavity silicon mold (each cavity is ~2″ x 1 and 1/8th” x 5/8th”) with cooking spray to prepare, and set aside.In a medium mixing bowl, sift together your dry ingredients – flour, baking powder, baking soda, and salt, and set aside.
In a larger bowl, using a stand or hand mixer, cream together the butter, granulated sugar and vanilla for 2-3 minutes until light and fluffy (don’t stint on the time; this helps the sugar and butter integrate well together).
Add the eggs one at a time, beating well to integrate after each one. Add the orange zest and beat until combined. Mix together the orange juice and milk, then lower the speed of the mixer to add the juice/milk mix, alternating with the dry ingredients. Be sure to start and finish with the dry ingredients. Scrape the sides of the bowl as needed.
Using a tablespoon measure, spoon a tablespoon of batter into each of the 16 mold cavities and lightly smooth out the tops with your finger. (You can level the tablespoon, or use a very slightly rounded tablespoon – just be consistent so all of the teacakes bake evenly.) Put into the oven and bake for 15-20 minutes (because these are so small, they do not take long to bake – check them at the lower temp, check that a toothpick comes out clean, and return them to the oven if needed). Remove from the oven when baked and let cool for 10 minutes on a cooling rack, then remove from the molds and repeat until all the batter is used.
To make the Cream Cheese Frosting: Beat the cream cheese, butter, orange juice and orange zest in a mixing bowl with a stand or hand mixer until creamy. Mix in the powdered sugar gradually until blended and smooth. This frosting will be a little too loose to pipe and expect it to hold shape; you could experiment by using less of the orange juice, if you wanted it a little firmer. You’re going to have some frosting left over – you could cut the tea cakes in half and put a little in the center like a sandwich cake, or use a good amount on the top to use as much of it as possible.
To assemble the Teacakes: Put your frosting into a tipless piping bag and cut a hole in the end – it doesn’t have to be a very small hole, as you’re going to just go back and forth over the top of the tea cakes to get a little ripple effect, and you want a good amount of frosting on each one.
If you want to add a white chocolate garnish on the top, melt your white chocolate (I used the microwave, 15 seconds at a time until it was melted). Split your chocolate and color about 2/3rds of it with orange food coloring, leave the other 1/3 white). Taking a small sheet of transparent acetate and spread the orange-colored chocolate with an offset spatula (not too thin). Then put the white chocolate in a tipless piping bag and cut just a small hole to allow enough of the chocolate to come out in a random drizzle across the top. Finally, as the chocolate starts to harden, use a large-ish round piping tip to mark circles that you can pop out of the chocolate after it’s completely cooled. Then just put one on top of each of the tea cakes after you’ve frosted them.
Then serve and enjoy! These will keep for a few days in an airtight container at room temp or in the fridge (take them out of the fridge for 30 minutes before serving, if you’ve chilled them).
