I’ve been wanting to try some bread-baking lately – maybe I’ve been infected with the same bug that’s hit so many other people during this pandemic (puns intended!). I used to keep a sourdough starter years ago, and made bread for awhile in my late teens; but I won’t tell you how long ago that was now!
Lately, my thoughts have been focused on wanting to try out breads that will go well with savoury tea sandwiches. To kick it off, I wanted to find something very homey, chewy, with a nice outer crust, and something with a close crumb that didn’t have a lot of irregular holes.
Did a bit of research and came up with a Rustic Italian bread in Baking Illustrated, by Cook’s Illustrated. It was my first time trying the recipe. But it lays everything out so explicitly, with visuals, describes the science behind what you’re doing – I felt like it was worth a try. And I ended up being quite pleased with my first result!
I will say that while the steps are pretty straightforward, it’s time intensive, lots of “hurry up and wait”, as in – do a task, then wait for something to happen (usually proving!). So it took time to follow the recipe exactly. I thought the flavor was lovely, though, so I would recommend giving it a try!
But before I launch into the recipe, a note about the bread flour. I’ve been reading about “heritage flour”, like the flour people would have used a century ago, before dwarf hybrids were introduced as part of the evolving “food industry”, and nutritional makeup and taste of bread came from naturally growing wheat breeds that weren’t modified.

So I looked around a little, found there are options to buy milled heritage flour straight from local mills. I ended up ordering the heritage bread blend from Sunrise Flour Mill in Minnesota. I really loved the flavor of the bread using this flour.

The other “first” for me with this loaf is I used a Danish whisk to mix it together. Something very satisfying about using pure elbow grease to bring the bread together.
Preparation and proving of this recipe takes awhile – like a day or so, so make sure to plan ahead. It starts with making a “sponge” (not the cake kind!), that acts like a starter. I made my sponge the day before, then finished it and did all the proving and baking the second day.
There are at least 4 hours of proving that happen an hour at a time, not counting some time for the dough to “rest” here and there as you do something else.

I stuck to the same basic ingredients called for by the recipe 
It came together quickly with the whisk, which worked well for some of the initial kneading; this is before the sponge was added

As this was my first big bread experiment in a long time, I did switch to the electric mixer and dough hook for the four-minute knead – just wanted to make sure it got kneaded enough and wasn’t sure I’d manage that by hand in this recipe
Having not made this recipe before, I was a little unsure whether I would get the good bubbling and rising, but my yeast didn’t fail me – after each time I set it aside at room temp to prove and rise, it always seemed to rise exactly as the recipe described.

This was probably after my first rise – they all seemed to blend together after awhile!
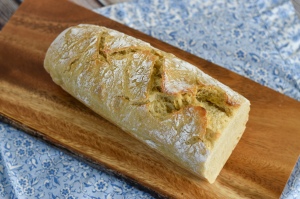
I think the trick is to be gentle with the dough when you get to the shaping. You’ve already done the kneading, so it’s really just massaging it into the shape you want. I had an oblong baking cloche like this one I wanted to try out, so that’s how I shaped mine. Plus, I used one of the Banneton rattan Brotform baskets to rise the dough before putting it into the cloche.


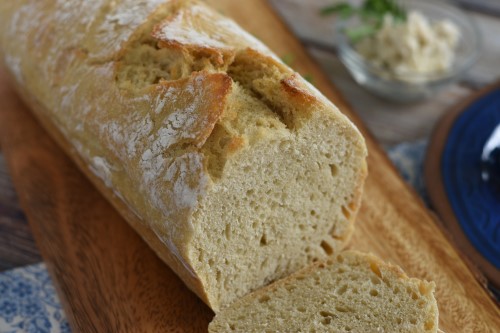
This bread came out with a nice close, fairly even crumb, which is great for tea sandwiches
Rustic Italian bread

Ingredients
-
For the Sponge
- 2 c. (11 oz.) bread flour
- 1/4 tsp. instant yeast
- 1 c. water at room temperature
- 3 c. (16 1/2 oz.) bread flour, plus more for dusting the work surface and hands
- 1 tsp. instant yeast
- 1 1/3 c. water at room temperature
- 2 tsp. salt
Ingredients
Directions
To make the sponge: Combine flour, yeast and water in a bowl and bring together with your Danish whisk; knead until the ingredients form a “shaggy” dough, or 2-3 minutes. (If using an electric mixer, use the dough hook and knead at the lowest speed.)Transfer the sponge to a medium bowl and cover tightly with cling film; let it stand at room temperature until it begins to bubble and rise. This could take about 3 hours. After you see bubbles and a rise, put the sponge in a refrigerator for at least 8 hours, or up to 24 hours. So you could start this day before you want to bake the bread.
To make the dough: Take the sponge from the fridge and let it stand at room temperature while you make the dough. Combine the flour, yeast, and water in a large bowl and knead at the lowest speed with Danish whisk until a rough dough is formed, or about 3 minutes. (If using an electric mixer, use the dough hook and mix at lowest speed.)
At this point, simply cover the bowl loosely with cling film, leaving in the whisk or dough hook, and let the dough rest for 20 minutes.
Remove the plastic wrap and add the sponge and salt to the dough. Continue to knead until the ingredients are incorporated and the dough is formed, about 4 minutes. Check state of the dough – it should clear the sides of the bowl but stick to the bottom. Continue to knead until the dough forms a more cohesive ball Iif using the electric mixer, set the speed to medium low). Do this for about 1 minute.
Transfer the ball of dough to a large bowl that has been lightly oiled – make sure this is at least 3 times the dough’s size. Cover this tightly with cling film. Let the dough rise in a cool, draft-free spot until slightly risen and puffy, about 1 hour.
Remove the plastic wrap, and start shaping the loaf. This means taking a plastic scraper under one side of the dough, gently lifting and folding a third of the dough toward the center. Then do the same with the opposite side of the dough. Finally, fold the dough in half, perpendicular to the first folds. The dough should be in a rough square. Then replace the cling film and let the dough rise 1 hour.
Repeat this process again, replacing the cling film and letting the dough rise for 1 more hour.
Next step is to shape the dough. Liberally dust a surface with flour and gently scrape the dough from the bowl onto the work surface. Dust the dough and your hands liberally with flour and, using minimal pressure, push the dough into a rough 8- to 10-inch square.
Start shaping the dough by folding the right corner diagonally to the middle, then the top left corner, then the top middle, and roll the dough into a rough log, rolling it over its seam. Then pick it up at both ends to transfer the roll of dough to a sheet of parchment paper. Gently shape it into about a 16-inch football shape (that is a US football, not a soccer ball!). Dust the loaf again liberally with flour and loosely cover with cling film. Let the dough rise again until doubled in size – about 1 hour. (I used my Banneton rattan basket form for this last rise, keeping it on the parchment.)
While the dough is doing its last rise, adjust an oven rack to the lower-middle. I used a baking cloche, but you can use a baking stone as well. Heat the oven to 500 degrees Fahrenheit.
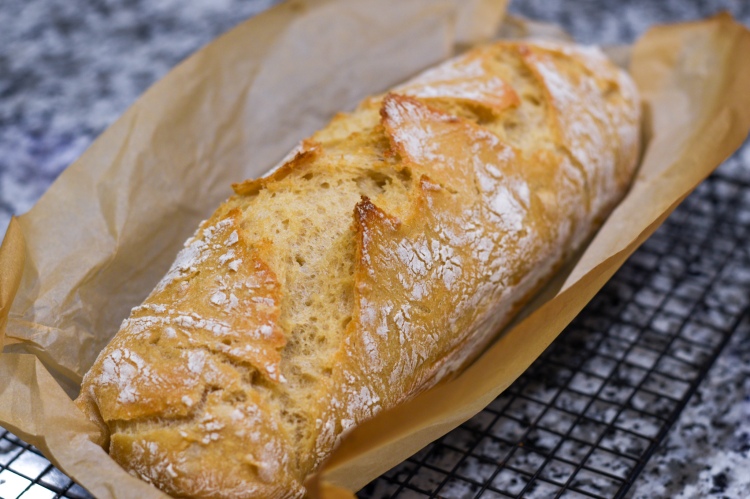
Transfer the risen loaf to baking cloche, if using one (I transferred it with parchment paper and all). Use a single-edge razor blade or sharp knife to cut diagonal slits down the length of the loaf. Then spray the loaf lightly with water. If you’re using a baking stone, transfer it to the hot stone in the oven now.
Bake 10 minutes, then reduce the oven temperature to 400 degrees Fahrenheit. Quickly rotate the loaf and continue to bake until deep golden brown, or about 35 minutes longer. An instant thermometer should read 210 degrees Fahrenheit. Transfer to a wire rack an let the loaf cool to room temperature, or about 2 hours.
So take a look through the recipe from start to finish, so you know what you’re getting yourself into – only a few ingredients, straightforward process, but an investment of time and making sure you don’t get distracted and forget to follow steps or leave too much proving time.
However, I think it’s a delicious, hearty loaf that is worth the effort in the end!

It paired well with my Crab Salad sandwiches for afternoon tea

This is a really beautiful loaf!
LikeLiked by 1 person
Thanks, Dorothy! it tasted pretty good too 🙂
LikeLike